Wednesday, December 11, 2013

WEEK 13

Title : Proposal Report for Final Year Project 1

Introduction


This week is the last week to submit a report of the proposal project and also the last week to update the blog or logbook. All the requirements needed on this week have been prepared before. Failure to submit the project proposal report and update the blog or logbook to the supervisor will have an impact on the overall mark for this subject FYP 1. This is because the assessment done by their supervisors without involving other instructors. The deadline for completing this assignment is on 13/12/13 ie before at 5.00 pm.

Objective
  1. To documentation all the idea and information of the project  in a report.
  2. To ensure all the assessment criteria is achieved perfectly.

Problem Encountered

All the requirement that needed in implementing a report project has been made and meets all the required assessment criteria which means the first and second of the objective is achieved perfectly. However, a bit of problem occurs in make the report project, it is to compress the information that already have, to be a good report of project proposal. As a solution, the guidelines for project proposal that prepared by FYP committee will be made as a guideline in making the report .

Project Description

The entire criteria that needed in making the project proposal report will be fulfilled by referring the proposal presentation assessment that given by FYP committee. Below is a copy of the documents that given:-


                                                 Figure 1 : Guidelines Project Proposal.

All the figures above is the guidelines to prepared the project proposal report .

Project Outcome

All task for this semester already done


Tuesday, December 10, 2013

WEEK 12

Title : Microcontroller PIC coding lerning

Introduction

Microcontroller PIC is the main controller of egg incubator project. Microcontroller is a subject that has been learned during the last semester. This week, I am more focused study on the basis of microcontroller coding. It's refreshing to learning more about the basics of coding.


Objective 
  1. To understanding and learn about the microcontroller basic coding.
  2. To refreshing previous study about microcontroller basic coding.
Problem Encountered

To learn microcontroller, we must have software MPLAB and Proteus. This is because the MPLAB software is used to write the coding and Proteus is to draw a circuit / hardware on a project with the intended to understand the functionality of the project when encoding implemented. The problem is my MPLAB software have corrupted because I lost the library file for MPLAB software.So I am do not able to
creating library file,defining library file,inclusion of library file into program and adding Functions to the Library.That is important in creating a coding when it compile the code.The problem is considered completed, when I reinstall the MPLAB sofware.


Project Description

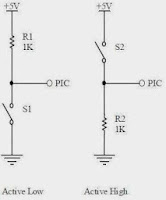
Process of learning this week focused on how to program push button, LCD and interrupt learning using MPLAB software. This is because it is will be used in incubator projects that will be developed later.The first step I need to know how the connection. To be connected to the PIC Microcontroller, I can choose to make 'active high' or 'low active'. The sequel is as below.


Figure 1: Push Button connection circuit 


For active low, in normal conditions PIC port is high. When the switch is press, the ports of the PIC will be low.While the active high, in normal circumstances PIC port is low. When the switch is press, the PIC port will be high.

Second,LCD (Liquid Crystal Display) is a device to display various character. Among these having dot matrix LCD controller is HD44780. HD44780 can be operated in 5x8 or 5X10 dot matrix. LCD's have some size by the number of characters. Among them are 16X2 or 20x4 character. 16X2 character LCD means it has 16 characters in line with 2 lines. LCD has 16 pins.


                                                        Figure 2 : LCD display  HD44780

Thirdly, interrupt is one of the special functions in PIC. Interrupt is used to place a significant program on reason for the occurrence a particular source. PIC16 has 15 interrupt sources. Selection interrupt address is determined by the number of INTCON, PIE1 and PIE2.


                                                    Figure 3 : Address and register for interrupt.

Project Outcome

The result that have already learning from this task is such as that shown below:-


  1. Push Button


                                    Figure 3 : The result from Proteus software using Push Button


                                               Figure 4 : MPLAB software coding code.

      2. LCD display


  Figure 5 : The result from Proteus software 


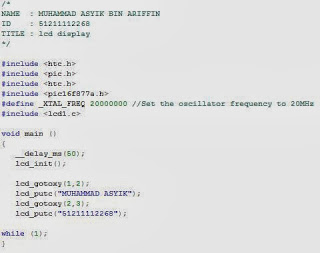
                                  Figure 6 : MPLAB software coding code to display name and id

      3. Interrupt


Figure 7 : Showed on the Proteus ISIS program.


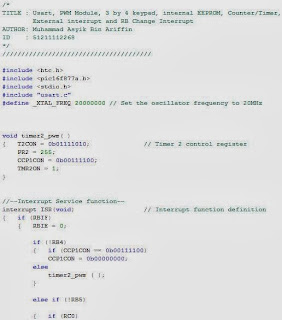
Figure 8 : The program coding for interrupt function


As a conclusion,refreshing study is important to ensure the project do not have a problem, when it's time for me to complete the project incubator.This is because to program the project  that proper functioning is the part of most complicated to implement.

Sunday, December 8, 2013

WEEK 11

Title : Budget

Introduction

Every project will be developed requires a budget. The budget process is to collect all related costs with finishing a project. In other terms, it is adding up estimated costs for every activity performed by the individually to complete the project that is being developed accurate at the expected time. This week, the total cost of the project has been estimated to be listed and discussed in detail.

Objective
  1. To estimate overall cost of the project.
  2. To list cost of the entire material that will be used in this proposed project.
Problem Encountered

In the budgetary cost of the project, the difficulty is in finding quality and cheaper products. It is because usually quality products will be sold at a high price and to get the cheapest price, the quantity of goods that requires a a lot of each item purchased.Several initiative will be taken for the purposes to solve this problem i.e. survey a few stores that sell the cheapest product before buying that product.

Project Description 

To overcome the problems that face. Several solutions have been made​​, which is to find associated shops through the various websites. Moreover, with reference to my friends and lecturers, typically in finding the components of the project.As a result of suggestions senior students and lecturers, there is an online company that sells a variety of electronic components, electrical and others. The company is Cytron Technologies and to reference there is website for that company http://www.cytron.com.my.

Project Outcome

The result that obtained from this task is such as a table that shown below:-


                                          Table 1: Estimation on the overall cost of the project

The total cost to develop the project is about RM 311.9. It is still affordable to the consumer. However, there are some components that are not sure the market price because it needs to be booked. But it is still within the overall budget RM 311.9.


Monday, December 2, 2013

WEEK 10

Titles : Presentation Final Year Project 1 

Introduction


During this week  is a presentation week for all student taking the subject FYP 1/13. In this presentation, the student is required to prepare with provide a slide presentation for the project. Presentation project is important to ensure that project will be developed according to the criteria accepted by the desired assessor. The format for final year project presentation was provided to the students and they can make referrals based on proposal assessment criteria. The overall mark obtained by students is the average mark given by Supervisor and second assessor. This week, a preparation for presentation day will be made and discussed clearly.The proposal presentation will be held at Gemilang Hall and start from 2.00 p.m till 5.00 p.m. Students will be assessed by two persons of invited assessor from related department with the project title.


Objective 
  1. To make some preparations before presentation day.
  2. To making a PowerPoint presentation according to the assessment criteria that given.
  3. To presented the idea of the project.
Project Encountered

The activity on this week there are some problems encountered especially content filling in the slide because there is a less information accurately obtained from friends and others. All the problems encountered in preparation of the slides can be solved by reference and discuss with supervisor Sir Ahmad Rashidi Bin Amran. The content that should be included in the slide is of assignments that have been made during this semester.The things that need to be made only extract all gathered information briefly, concise and easy to understand.


Project Description


From all the information gathered during the week before will be extracted in a way that is easily understood by the required assessment criteria. Every slide will be decorated to look more attractive because sometimes people will get bored when too many words are included in the slide. As a solution, some information will be described using SmartArt graphics visual  and  Microsoft visio for presenting information. Pictures are also used to make the slide more interesting. Below showed the proposal presentation assessment that must following by students:-


                                                           Table 1 : Assessment criteria

Project Outcome

My assessor for my presentation are Dr. Hafiz  and Madam. Hidayah. I had presented about my idea that is the Microcontroller Based Eggs Incubator complete with its methodology, problems statement and many more.The figure below is a slide that has been made for presentation day.


                                                            Figure 1: Presentation slide.

All the completed slides will be shown to the project supervisors before presentation day. As a conclusions, all tasks for this week completed perfectly and the power point presentation that has been made has been approved by project supervisor.


Friday, November 29, 2013

WEEK 9

Title : Literature Review

Introduction

At week 9, the study focused on a literature review of existing projects that have been in the market. This study is important, to ensure that project will be built on the right track, so that, it does not depart from the original objectives of the project. Results from this study will be used to improve project microcontroller-based egg incubator, in order to complete a project eggs incubator  better than before.

Objective
  1. To gather information from the existing project as a reference.
  2. To study about eggs incubator control system using microcontroller and other devices.

Project Encountered

This week, more study on literature reviews as reference material and to add the idea in designing the project. Actually, none of the problems encountered in this review, because it is just knowledge / guidance in developing an incubator project, so do not much of a problem encountered during the completion of microcontroller based projects egg incubator

Project Description

There are many egg incubators at market nowadays. They come with several features that differentiate their product with other. However, they use the same principle in creating their product. For example, Automatic Forced-Air Incubator  uses a light bulb to increase the temperature in the incubator, while, Mini Eco Eggs Incubator , uses heater coil for the same purpose. In this project, smart incubator makes the other eggs incubator as literature review in order to provide an automatic eggs incubator at low cost and easy to handle.
Below is 2 example existing project to be the reference :-


  • Automatic Forced-Air Incubator

Automatic model with a capacity / load the eggs of 100 eggs, also can accommodate nearly 300 quail eggs. For operating an automatically diverting eggs for up to 8 times a day by the installation of electric motor, timers and relays. Using a thermostat brand products Caemz Italy known for its precision control of temperature up to 1 degree Celsius, clear digital thermometer displays the temperature of incubator operation, the blower fan is temperature resistant and moisture and heat lamps are easily replaced with 5 watt, low and save electricity.


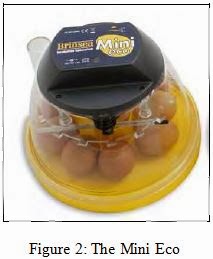
  • The Mini Eco

The Mini Eco holds 10 hens‟ eggs (or equivalent) and provides the fine temperature control to ensure consistent and reliable hatches. Temperature is monitored on a purpose built liquid-in-glass thermometer and although factory set, the electronic temperature control allows fine tuning of the temperature setting if required.


Project Outcome

Based on studies and observations that have been performed on two example project that Automatic Forced-Air Incubator and The Mini Eco. There are some advantages and disadvantages on both of this project. Therefore, all the advantages of existing projects will be used and any deficiencies will be corrected/improved. Below, there is little information about the features of the project to be developed and the project is already available in the market today.


Tuesday, November 26, 2013

WEEK 8

Title : Block diagram of project

Introduction 

The block diagram is created to identify the inputs and outputs that will be used in the project. It consists of a combination of all of the problems encountered and the information obtained from research with the best solution for the purpose. Block diagram is a diagram of a system in which the parts or functions are represented by block of connected the lines that show the relationship the block. At the end of this section, a complete block diagram.

Objective

  1. To design the block diagram that exactly with the required specifications for this project.
  2. To know the input and output of the project through a block diagram.
Problem Encountered

From the activities this week, it does not have much of a problem because the information used to make the best solution is from data collected before and it will not give any problem to develop a block diagram.

Project Description

The information gathered from previous research is compressed to achieve the main objective of the project is in an easy and efficient way to create an egg incubator project. Once the input and output are identified through previous studies. Thus, the result was the a block diagram for this project.

Project Outcome

The concept that will be used in Micro controller based eggs incubator is such as block diagram at figure 1 below :-


Saturday, November 23, 2013

WEEK 7

Title : Components and parts of project

Introduction 

Each project to be developed has a distinctive design. This is because of the design phase of the project is one that should be in developing the project. The purpose of the design phase of the project is to achieve the specific goals, specific tasks, and certain results, so it does not run away with the project objectives. In all the tasks for this week, it also includes a few inquiries for parts / components that will be used in the project.

Objective
  1. To design the project coincides with the main objectives of the project.
  2. To investigate the material / component / equipment that will be used throughout the project.
  3. To combine all the materials obtained according to the designed project.
Problem Encountered


Designing efficient project requires experience in certain fields and basic knowledge of other matters related to the design is required. Without these criteria, it will be quite difficult to design the project. However, with reference to the some websites it can also give you some ideas that are very helpful for designing the project according to the required design. This is because, if the design is not perfect incubator based characteristics are required will cause damage to the eggs during the hatching eggs. Design an incubator influencing the temperature and humidity in the incubator, if not taken care, it will damage the embryo in the eggs before they hatch.In the find for materials that will be used, the type of material and product specifications required in this project should be identified to prevent material from getting damaged during testing and building / fixing / circuits. However, this problem can be solved by doing a study / research is needed and record important data for used in the future.

Project Description

In designing the project some important elements should be taken. Following a few questions that should be taken into consideration in designing the project. Among them are : -
  1. What is the concept/theme of the project that want to designed?
  2. What is the type of material that suitable to used? (i.e plastic, wood, steel and etc).
  3. Project size - how large project size that needed accordance with the project criteria.
  4. What is the type of controller that want to used? (i.e u-controller - PIC16F877A,  and etc).
  5. What is the materials that needed for I/O?
  6. How much the amount of voltage/current needed for each electrical/electronics materials?
Based on the list of questions above, the concept is simple to use and compact.Type of material that will be used for the design of incubators and protect the circuit is from plastic materials. The size of the design project is small eggs incubator for easy to control the temperature inside the incubator and simple to change places.In term of their controller, PIC 16F877A - Main Board will be used as circuit controller.Why PIC16F788A to make it the first choice as a controller circuit in the project? It is because cheaper and one a simple way to control circuit includes a code of their programs. Moreover, to practice what has been learned in the introduction of micro controller subject to the project.

Below is the materials that will be used for I/O and the additional materials including with the specifications for each materials will be listed such below:-

List of materials:

Hardware

  1. PIC 16F877A 
  2. Power supply 12V
  3. LCD Display
  4. LED
  5. Torque motor 
  6. Push button
  7. Limit switch
  8. Light bulb
  9. Casing
  10. LM35 sensor
  11. Various size single core of cable/wire
  12. Soldering tool kit
  13. Capacitor,resistor,transistor,diode and etc.
  14. Op-amp (LM 741)
  15. Voltage regulator +5V
  16. Relay
  17. Mosfet IRFZ46N

Software 

  1. PIC16F877A

Project Outcome

As a result of the project, the concept / theme of the project design that will be used is simple and compact design that coincides with the main objectives of the project .From the figures below show the picture of PIC16F877A, pin configuration and specification :-


Monday, November 11, 2013

WEEK 6

Title : Flow chart

Introduction

In each project should have its own flow charts. This is to describe the function or movement of a project. Therefore, the design phase of the project is one that should be in developing the project. The purpose of the design phase is to achieve the project with specific goals, specific tasks, and specific results. More specific, the better, which is more in line with the objectives of traditional teaching, the better. In all the tasks for the week, it also includes a few inquiries for parts or components to be used in this project.

Objective
  1. To define some of important elements that need to be applied in the design flow chart.
  2. To understand the process of project through a flow chart are designed.
Problem Encountered

The flow chart is one of the important parts that need to be known and provided that when developing a project. In the process of completing the flow chart there is some difficulty in making especially in terms of flow charts to determine the appropriate flow chart symbols to be used precisely to the project. However, it was not a big problem because the problem was solved by doing some research on the web and other sources (ie those who are experienced, lecturers, friends etc.).

Project Description

To create a flow chart for the project, visio software are used because it has important information that there is a flow chart symbols in visio software for the purpose of creating a true symbol of flow charts that will be created for this project. The information obtained will be inspired to the real flow chart. Flowchart illustrations that have been created will be shown in the next topic below.

Project Outcome

For this week, the result of this task will be obtained as the figure 1 flow chart below: -

Figure 1 : The process of flow chart


Saturday, November 2, 2013

WEEK 5

Titles : LM 35 Temperature Sensor for eggs incubator project


Introduction

Last week, we made a study of the types of temperature sensors. For this week, we will study the temperature sensor can be used for micro controller based eggs incubator project. Temperature sensor suitable for this project is  lm 35 dz temperature sensor.


Objectives
  1. To compress all the information obtained from the research to make it as the best solution for a good .project.
  2. To know the characteristics of the temperature sensor lm35 dz.


Problem Encountered

From this research, it not have much of a problem as the information used to make the best solution is from data gathered before and it will not give any problem to use a temperature sensor lm35 dz type of eggs incubation project.

Project Description

Selection of temperature sensor is very important for this incubator project because it requires an precise reading of the temperature data to ensure that the temperature inside the incubator care is in good condition. This is because, the unstable temperature will damage the embryo in the egg. So, LM35 DZ is the right choice for this project based on the characteristics available on this sensor.Further, there is little explanation of the LM35 temperature sensor operation.

LM35 is a precision IC temperature sensor with its output proportional to the temperature (in oC). The sensor circuitry is sealed and therefore it is not subjected to oxidation and other processes. With LM35, temperature can be measured more accurately than with a thermistor. It also possess low self heating and does not cause more than 0.1 oC temperature rise in still air.
The operating temperature range is from -55°C to 150°C. The output voltage varies by 10mV in response to every oC rise/fall in ambient temperature, i.e., its scale factor is 0.01V/ oC.

Pin Diagram:


Why Use LM35s To Measure Temperature?

  • It's can measure temperature more accurately than a using a thermistor.
  • The sensor circuitry is sealed and not subject to oxidation, etc.
  • The LM35 generates a higher output voltage than thermocouples and may not require that the output voltage be amplified.


What Does an LM35 Do?  How does it work?
  • It has an output voltage that is proportional to the Celsius temperature.
  • The scale factor is .01V/oC
  • The LM35 does not require any external calibration or trimming and maintains an accuracy of  +/-0.4 oC at room temperature and +/- 0.8 oC over a range of 0 oC to +100 oC.
  • Another important characteristic of the LM35DZ is that it draws only 60 micro amps from its supply and possesses a low self-heating capability. The sensor self-heating causes less than 0.1 oC temperature rise in still air.
For more information about this, please click here.LM35 DZ Datasheet


Project Outcome

What can i expect when  use An LM35 is :-

  • I will need to use a voltmeter to sense Vout.
  • The output voltage is converted to temperature by  a simple conversion factor.
  • The sensor has a sensitivity of 10mV / oC.
  • Use a conversion factor that is the reciprocal, that is 100 oC/V.
  • The general equation used to convert output voltage to temperature is:
  • Temperature ( oC) = Vout * (100 oC/V)
  • So if  Vout  is  1V , then, Temperature = 100 oC
  • The output voltage varies linearly with temperature.

How do use  LM35?  
  • Here is a commonly used circuit.  For connections refer to the picture below.
  • In this circuit, parameter values commonly used are:
              -  Vc = 4 to 30v
              -  5v or 12 v are typical values used.
              -  Ra = Vc /10-6
              -  Actually, it can range from 80 KW to 600 KW , but most just use 80 KW.


Tuesday, October 22, 2013

WEEK 4

Titles : Temperature Sensor

Introduction

In this project micro controller based eggs incubator, the temperature for hatching egg care is important to ensure that the eggs are not damaged when the hatch later.Temperature sensors are used in this incubator project is to control the appropriate temperature to hatch chicken eggs.Temperature is defined as the energy level of matter which can be evidenced by some change in that matter.Temperature sensors come in a wide variety and have one thing in common: they all measure temperature by sensing some change in a physical characteristic.Temperature sensors are devices that are used to gather information or data about temperature from specific sources and, convert the data into understandable forms for an observer or for other devices. They come in different forms and, therefore, their applicability is not limited. They are used in simple matters like taking body temperature or room temperature to more complex scientific use.

Objective
  • To gathering information about  types of temperature sensor.
  • To know the type of temperature sensor that is suitable for projects.


Problem Encountered

From this activity, it is not have much problem because the information that used has been investigated in previous week.


Project Description

The seven basic types of temperature sensors to be discussed here are thermocouples, resistive temperature devices (RTDs, thermistors), infrared radiators, bimetallic devices, liquid expansion devices, molecular change-of-state and silicon diodes.

Thermocouples

Thermocouples are voltage devices that indicate temperature by measuring a change in voltage. As temperature goes up, the output voltage of the thermocouple rises - not necessarily linearly.

Often the thermocouple is located inside a metal or ceramic shield that protects it from exposure to a variety of environments. Metal-sheathed thermocouples also are available with many types of outer coatings, such as Teflon, for trouble-free use in acids and strong caustic solutions.

Resistive Temperature Devices

Resistive temperature devices also are electrical. Rather than using a voltage as the thermocouple does, they take advantage of another characteristic of matter which changes with temperature - its resistance. The two types of resistive devices we deal with at OMEGA Engineering, Inc., in Stamford, Conn., are metallic, resistive temperature devices (RTDs) and thermistors.

In general, RTDs are more linear than are thermocouples. They increase in a positive direction, with resistance going up as temperature rises. On the other hand, the thermistor has an entirely different type of construction. It is an extremely nonlinear semiconductive device that will decrease in resistance as temperature rises.

Infrared Sensors

Infrared sensors are noncontacting sensors. As an example, if you hold up a typical infrared sensor to the front of your desk without contact, the sensor will tell you the temperature of the desk by virtue of its radiation - probably 68°F at normal room temperature.

In a noncontacting measurement of ice water, it will measure slightly under 0°C because of evaporation, which slightly lowers the expected temperature reading.

Bimetallic Devices

Bimetallic devices take advantage of the expansion of metals when they are heated. In these devices, two metals are bonded together and mechanically linked to a pointer. When heated, one side of the bimetallic strip will expand more than the other. And when geared properly to a pointer, the temperature is indicated.

Advantages of bimetallic devices are portability and independence from a power supply. However, they are not usually quite as accurate as are electrical devices, and you cannot easily record the temperature value as with electrical devices like thermocouples or RTDs; but portability is a definite advantage for the right application.

Thermometers

Thermometers are well-known liquid expansion devices. Generally speaking, they come in two main classifications: the mercury type and the organic, usually red, liquid type. The distinction between the two is notable, because mercury devices have certain limitations when it comes to how they can be safely transported or shipped.

For example, mercury is considered an environmental contaminant, so breakage can be hazardous. Be sure to check the current restrictions for air transportation of mercury products before shipping.

Change-of-state Sensors

Change-of-state temperature sensors measure just that - a change in the state of a material brought about by a change in temperature, as in a change from ice to water and then to steam. Commercially available devices of this type are in the form of labels, pellets, crayons, or lacquers.

For example, labels may be used on steam traps. When the trap needs adjustment, it becomes hot; then, the white dot on the label will indicate the temperature rise by turning black. The dot remains black, even if the temperature returns to normal.

Change-of-state labels indicate temperature in °F and °C. With these types of devices, the white dot turns black when exceeding the temperature shown; and it is a non reversible sensor which remains black once it changes color. Temperature labels are useful when you need confirmation that temperature did not exceed a certain level, perhaps for engineering or legal reasons during shipment. Because change-of-state devices are nonelectrical like the bimetallic strip, they have an advantage in certain applications. Some forms of this family of sensors (lacquer, crayons) do not change color; the marks made by them simply disappear. The pellet version becomes visually deformed or melts away completely.

Limitations include a relatively slow response time. Therefore, if you have a temperature spike going up and then down very quickly, there may be no visible response. Accuracy also is not as high as with most of the other devices more commonly used in industry. However, within their realm of application where you need a nonreversing indication that does not require electrical power, they are very practical.

Other labels which are reversible operate on quite a different principle using a liquid crystal display. The display changes from black color to a tint of brown or blue or green, depending on the temperature achieved.

For example, a typical label is all black when below the temperatures that are sensed. As the temperature rises, a color will appear at, say, the 33°F spot - first as blue, then green, and finally brown as it passes through the designated temperature. In any particular liquid crystal device, you usually will see two color spots adjacent to each other - the blue one slightly below the temperature indicator, and the brown one slightly above. This lets you estimate the temperature as being, say, between 85° and 90°F.

Although it is not perfectly precise, it does have the advantages of being a small, rugged, nonelectrical indicator that continuously updates temperature.

Silicon Diode

The silicon diode sensor is a device that has been developed specifically for the cryogenic temperature range. Essentially, they are linear devices where the conductivity of the diode increases linearly in the low cryogenic regions.

Project Outcome

During the week, what I have got from the research that has been done is whatever sensor we select, it will not likely be operating by itself. Since most sensor choices overlap in temperature range and accuracy, selection of the sensor will depend on how it will be integrated into a system.


Sunday, October 20, 2013

WEEK 3

Introduction


        The research project is an important part to find out information about the project to be carried out. For this third week is more research to egg incubation process.Incubation is the process by which birds hatch their eggs, and to the development of the embryo within the egg. The most vital factor of incubation is the constant temperature required for its development over a specific period.Embryonic development is a continuous process that can roughly be divided into three different phases. They are differentiation, growth and the maturation.

Objective
  • To gathering the information that needed in this project.
  • To know the proper egg incubation process.
  • To know the temperature and humidity of care for each type of egg.
Problem Encountered

          The success of this type project depends on proper care and incubation of the hatching eggs so healthy, vigorous chicks are produced. Many times a producer carefully attends to the incubation process but disregards the care of the eggs before they are placed in the incubator. Even before incubation starts the embryo is developing and needs proper care. Hatching eggs suffer from reduced hatch ability if the eggs are not cared for properly.

             At the start of incubation the embryo produces little heat and eggs must be warmed. This means that the air temperature must be higher than the egg temperature. As the embryo grows, metabolic heat production increases and to prevent overheating the air surrounding the eggs must be cooled such that heat is removed from the eggs.

          The condition of incubator is very importance element. Poor results are most commonly produced with improper control of temperature and/or humidity. Improper control means that the temperature or humidity is too high or too low for a sufficient length of time that it interferes with the normal growth and development of the embryo. Poor results also occur from improper ventilation, egg turning and sanitation of the machines or eggs.

Project Description

             The components than must be control in the incubator are temperature, humidity and ventilation. The temperature must depend on the types of egg. In order to hatch a good percentage of fertile eggs, an incubator must be able to maintain a constant temperature. Though different sorts of eggs require different heat levels, most will grow and hatch well at 99 to 101°F. Sure, that does sound imposingly precise, but such accuracy isn't all that difficult to achieve.The condition of the incubator for various types of egg showed at the table below:-


            The table shows the condition of the incubator for various type of egg which is consists of suitable temperature and humidity for every type of eggs. The Fahrenheit unit can be converting to Celsius by using the Fahrenheit formula, F = [32 + (9/5) a’C].


Project Outcome 

          As the project outcome,temperature and humidity for the care of hatching eggs is an important process for the project. From this research also, each species shall have the incubation period, temperature and humidity distinctive


Monday, October 7, 2013

WEEK 2


Title of activity:-
  • Create a blog for final year project 1.
  • Discussion with the supervisor about how to created the blog of the project that will developed.

Objective 
  • To ensure that students have a place to interact with supervisor.
  • To ensure the progress of project will be update to supervisor.

Procedure

           For the second week, I have consulted the supervisor to discuss about logbook for final year project. Later,the supervisor makes recommendations so that use a blog to replace the logbook so that easy to update the reports progress of the project.

Result 

           As a result of this week, I have created a blog for final year project .The project titled Micro-controller Based Incubator Eggs. From this blog, supervisors can view and comment the blog.

Conclusion

           Conclusion, each student is required to make a logbook or blog, but it's up to the supervisor to use the logbook or blog. This blog, facilitate students to update the progress of the project and it is also easier to find a project for supervisor.


Saturday, October 5, 2013

WEEK 1


Title of activity :
  • Find the supervisor for final year project 1.
  • Discussion the title for final year project 1 with supervisor.


Objective
  •  To make sure the student have supervisor that will supervise or guide student in their project until at the end of this subject.
  • To make sure the project that has been discussed is approved by supervisor.

Procedure

For the first week, students will have to find a project supervisor to monitor the project along with the students, but it depends on the scope of work for this subject that has been given. After that, when supervisors were chosen by students and then, students have to find the title of the project and suggest some topics for supervisors or project titles have been handpicked by the supervisor to the student. If the titles final year project was selected or approved, it is automatically registered officially in this subject by the supervisor.

Result

The results for this week, Sir Ahmad Roshidi Bin Amran of the data communication has been selected as the project supervisor. He passed one of the few projects that have been proposed. Projects were selected title is Micro-controller Based eggs Incubator and the project was successfully registered on the official website UniKLBMI-FYP.            

Conclusion


As a conclusion to this week, the objectives of the activities carried out successfully. Students can pursue the next step in their projects as soon as possible and meet the supervisor weekly to update the progress of the project.


Date : 12 September 2013

Title of activity : Final Year Project 1 briefing.

Briefing for final year project was held at room TTL 2 at 2pm. The purpose of this briefing is to ensure that students are aware of and understand the guidelines on this matter. In addition, to inform students about the use of  UniKLBMI-FYP  websites. The students were also given important information about what students need to do and some of the procedures they have to follow as finding a project supervisor, registered title and other projects were presented by Mrs. Nor Khairiah Bt Ibrahim, Sir Mohd Syazwan bin Md Yid and Mrs. Nulida Bt Abd Aziz.

As a conclusion from this briefing, students know the procedures that they should be following and some of the important date that they should be remind to complete all the tasks perfectly.